Pages
▼
Sunday, 22 December 2013
Crafty Christmas Gift Making - Part I
UPDATE: Please also see also Crafty Christmas Gift Making - Part II :)
Like last year I've managed to squeeze in a couple of sewn-by-me gifts for family :)
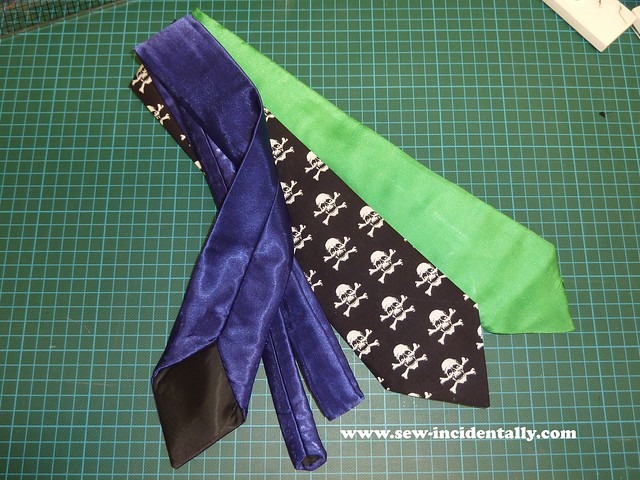
Earlier this year Hubby's 9 year old nephew requested 2 ties (specifically in blue and green), but I couldn't resist adding a third one too in a cool black and white skull-print cotton. I'm sure it'll appeal to a young man very well ;)!
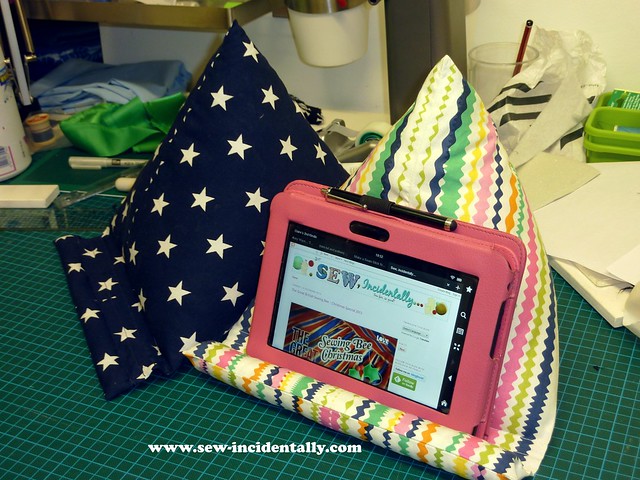
I also made some pillows/cushions for my parents-in-law. They're in 100% cotton and are so they can use them to rest their tablet's on - so your hands 'n' wrists don't get tired. They're great to pop onto your lap on the sofa. You could also use them as a stand for reading books in bed I'd bet and they'd work for iPads or other tablets too of course :)
I also reckon if these were made in something wipe-able (PVC Oilcoth perhaps?) that they'd make a suitable gift for someone in hospital or a care-home... as they could then be wiped-down with a cloth + anti-bacterial/anti-viral cleaning liquids (as cotton would probably need to go into a washing machine too often to be manageable in hospital etc.)
For the ties, I used this fab FREE pattern & tutorial The Totally Terrific Ties Tutorial from Fishsticks Design Blog . The tie come in 3 different sizes by age-group (v. handy!). I used the 8-14 years old size.
The green and blue ties are made from some 'el cheapo polyester lining fabric (lined with some black lining-fabric I had already in my stash). They were super-slippery to work with. I was worried that they'd not have enough body and be too flimsy, so I interlined them with a single layer of Calico (Muslin) cotton. Lots of hand basting was used, and I also overlocked (serged) the long raw-edges of the fabric (as per page 4 of the tutorial) which helped greatly in managing the mega-fraying lining fabric LOL!
NECK-TIES: I made a couple of changes to the construction:-
(1) I shortened the lining fabric-piece by 6mm in length (take out from the centre. Reason: So that the fashion-fabric would wrap a little around to the wrong/inside on the finished tie, therefore the lining would not "peek-out" onto the front.
(2) I added a horizontal loop to the inside-front of the tie (I used some cotton-tape for this, and Fray-Checked the raw edges so it wouldn't unravel in the wash). Reason: To tuck the end of the tie into - so it doesn't swing out and look unslightly when worn.
(3) I shortened the stitch-length considerable when approaching/turning-around the "points" / "corners" to reinforce them when I turned the fabric right-side-out.
(4) I used I used my duck-billed applique scissors to trim and grade the seam allowances on the pointed-ends of the ties to reduce bulk before turning them right-side-out.
The black cotton fabric was way easier to work with - and now that I've gotten the hang of neck-ties Hubby wants one (in the skull print!).
For the iPad / Tablet cushions I made quite a few adaptations to this tutorial: iPad Rest or Stand Tutorial. (found on BettyCrockerAss by Jen Carlton Bailly).
TABLET-CUSHIONS: Again I made my own tweaks:-
(1) The original tutorial gives you a cushion approx. 6½" wide. I'd previously made one following the instructions exactly and I felt that the size was a bit too small - so I changed it up to a 10" finished size.
(2) Also, I didn't like the original's way of finishing the raw-edges at the front. I felt that the "lip" effect looked a bit untidy so I changed it. On mine the front-edge is machine-stitched first before turning right-side-out.
(3) I stuffed my cushions with the old poly-stuffing innards from a recycled cushion - as the original asks you to use dry-rice. I didn't use rice because if it gets wet it'll get mouldy (it's a foodstuff afterall!)
(4) I used a cut-up scrap of ironing-board felt/padding to create the "stop"/"lip" stuffing at the front. (The tutorial uses dry-rice again.)


No comments:
Post a Comment
Hi there! If you would like to be notified by email when I (or anyone else) replies to your comment please click the 'Subscribe by email' link under this comment box.