
Pages

Showing posts with label tip. Show all posts

Wednesday, 13 August 2014

Straight Stitches on Knit Fabrics... I'm Skipping No More!


Settings for straight-stitching Jersey/knit fabric
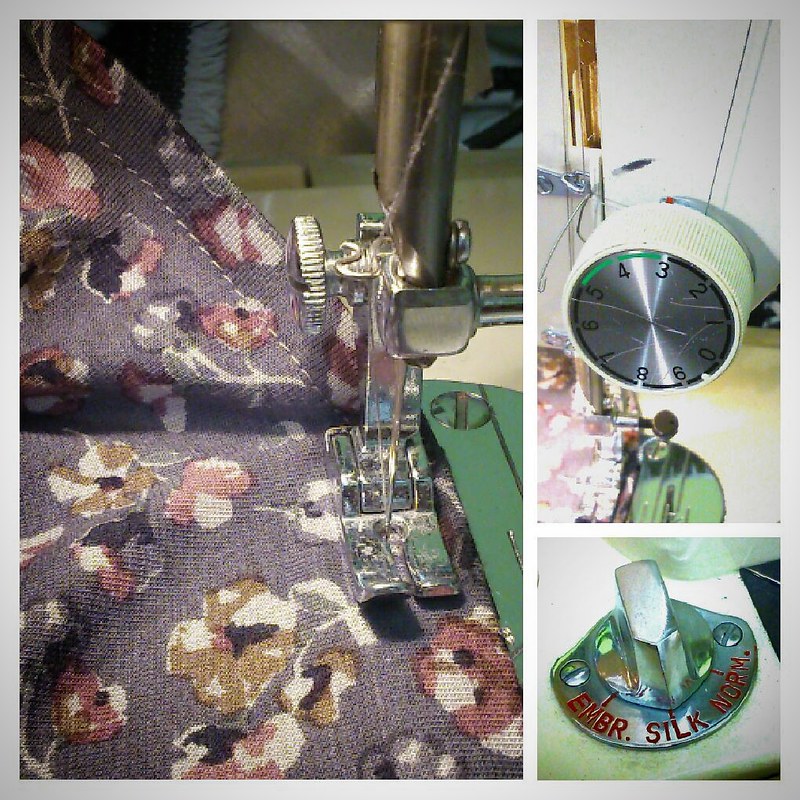
Settings that work for my machine to sew Jersey & Lightweight knit fabrics!
YES!!! I have FINALLY gotten together a successful formula for setting-up my beloved vintage zig-zag Novum sewing machine for stitching on jersey and other lightweight knit fabrics!

These days, since the Hubster bought me my lovely Overlocker (serger) for my birthday back in 2012 I'm usually okay for 95% of construction for T-Shirts and other knit garments. I just whizz them through the 'ol Brother 1034D with a smile on my face and the wind in my hair ;-) LOL! However, in the absence of a *Coverstitch sewing machine in my life I do like to get a straight-stitch effect on my cuffs and hems using my ordinary, regular sewing machine.

See an example below, of the typical problems I used to have with skipped stitches (from way back in 2012 when I sewed up Zoe's FREE vest pattern).
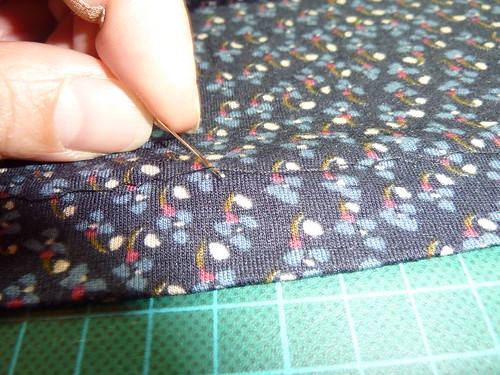
Skipped stitches
Opps - can we say "Skipped stitches?"

Previously, I struggled badly with skipped stitches and tension problems, all of which resulted in nasty, loose, unsecured, badly sewn seams, and pulled, wavy distorted hems :-(. Sooo NOT a good look for your me-made clothing!


My PREVIOUS Solution... 
I had until last night, been able to alleviate some of those problems to get "nearly" okay results by: 
• using a Microtex Sharp 70/10 machine needle (I had tried Universal, Ballpoint, Jersey, & Stretch needles, but counter to universally accepted advice 'Sharps' worked best for me!)
lowering tension on my upper thread (down from my usual 5 to 4), 
• using a medium stitch length (usually 2.5), 
• using a narrow width zig-zag stitch (to "look like" a straight stitch), 
• plus placing pieces of paper underneath the fabric (to aid it's movement through the machine - as it is sandwiched between the presser-foot from above, and by the feed-dogs beneath it). 
 using a super slow speed on the foot-pedal.


NOW, What I Do Instead...

I am now able to do the following to get a straight-stitch on anything from lightweight 100% Viscose knit fabrics, to Cotton/Lycra Jerseys
• using a Stretch 75/11 machine needle,
• lowering tension on my upper thread (down from my usual 5 to 3), 
• using a longer stitch length (increasing from 2.5 to 3.5-4), 
• using a straight stitch
• plus lowering the 'Feed Dogs' to the 'Silk' setting (so the machine "grips" the fabric more gently as it passes underneath the Presser Foot during stitching). 
• using a moderate-to-normal speed on the foot-pedal. 

And, these new-to-me settings don't require me to carefully rip out pieces of paper, or to painstakingly use my tweezers to remove miniscule tufts from the seams ;-) And, the stitching is completed much faster too - bonus!


My Thoughts on What Went Wrong Before Previously...
I'm assuming (and this is just me theorising here) that on my old settings where the 'Feed Dogs' were on the 'Normal' setting; that perhaps the machine was gripping the fabric too tightly? Maybe, that "grip" was causing it to slightly stretch/pull and alternately sometimes allow the jersey fabrics to get stuck just a little bit. Therefore, the irregular movement of the fabric passing under the presser-foot caused missed and skipped/ill-formed stitches. With the 'Silk' setting the grip is less-firm, and I believe that the fabric now moves through evenly and smoothly - thus allowing for a good stitch-formation to occur. I also believe that the reason I previously had to use the Microtex Sharp machine needles was, because the fabric was being stretched under the too-tight grip in some instances, it was effectively overly taut (like a trampoline!) underneath the path of the descending needle. So, the rounded-tip of Ballpoint etc. style machine needles simply "bounced" off of the tight fabric surface - as it was unable to pass through the fabric easily = missed stitches!!!


*Oh, my how I DO covet a Coverstitch machine but with x2 Overlockers, x3 Novums, x2 Brothers, and a Singer hand-crank in my life already I really don't have the space for one *sigh*


Friday, 26 April 2013

Gimme An "F"... For (Fabric) Face!!


Okay, so I have a day-off of work and I'm at home by myself - and I think "I know I'll throw some fabric in the washing machine to pre-wash it whilst I remember and I have the time." And, I don't know about you guys, but if I have the chance I much prefer that all my fabrics are washed, dried (I air-dry naturally folks = as there's no room for a tumble-drier in my house LOL!) and pressed before I decide to start a project. I find it rather off-putting when the passion and impulse to start something new turns into a damp squib because I haven't pre-washed my fabric yet :(  


Washing = 1 or 2 hours + Drying = another couple of hours + Pressing = Time wasted twiddling my thumbs.

So, now whenever I remember I wash new pieces of fabric as they join my stash + if there are some other similarly coloured as yet unwashed pieces they get thrown in to the machine too.

And that's just what I've done today.

But, before I wash 'em I have now adopted the following as best-practice for me...


    TIPS when you PRE-WASH YOUR FABRIC

    Overlock (Serge) Cut-Ends = prevents fraying, and reduces loose threads from clogging up
    your washing machine's waste pipe.

    Mark the Fabric “Face” - Any paper labels would dissolve in the wash - so,
    an embroidered “F” will identify the correct side (face) of your fabric.

.

TIP - Pre-washing fabric, overlock and mark the face
If you like this tip you can Pin-It here on Pinterest :) !

I was finding that I was constantly unclogging the waste-water drainage pipe on my washing machine on the next "normal" wash-load after I'd washed some fabric. And, each time the debris I removed was made-up of threads that I was tediously pulling out with some fiddly tweezers. All those threads were the same colour as the fabric I'd just washed... and it didn't take Sherlock Holmes to figure out the source LOL! Hence, now I overlock the cut-edges (no need on the selvedges of course!) before washing the fabric.


Different sides... And, it doesn't apply to all fabrics - as 99.99999% in my own stash have easily discernible face (front) from back/reverse sides - printed fabrics being an obvious example. However, some fabrics are soooo hard to tell - and if you were to accidentally mis-match pattern pieces it could affect the look of the garment as even a subtle difference in the reflected-light/colour/nap between 2 adjacent pieces could make a finished garment look "off". This happened today - I had a couple of pieces to wash that came to me with some handy green paper labels saying "FACE" stapled to the correct side of the fabric. Now, clearly paper is going to dissolve and fall off with the water in the washing machine. So, I quickly stitched a letter "F" into the selvedge on each piece = all sorted!


Saturday, 14 July 2012

TOP TIP: How Tracing Paper Is Your Friend (OR... How To Prevent N*pplegate When Cutting Out Your Patterns)!


Okay, so I've been working on my 2nd version of Jen from Grainline's fab Scout Woven Tee. My *first version was finished at the end of February (yeah I know nearly 5 months ago eek!). But, for my sins I've been on a health kick since the start of March and I'm 30lbs/13.6 kgs lighter than I used to be - so a lot of my original pattern alterations are now defunct. E.g. my waist is now 6"/15.cm smaller, and my biceps are around 1"/2.5cm smaller. I had originally graded up all my pattern pieces; made a FBA (full-bust alteration) which created a side bust dart where originally there had been none, plus I'd done a wide-bicep alteration too... so basically, I had some stuff to undo and fiddle around with. But, hey! It's all good experience for pattern alterations isn't it ;) LOL! (*Worn here in my recent outing with Miss Dibs!)

Anyway... I'd pinned the picture below of Kelli's Scout top make ages ago, 'cos I loved her version in black 'n' white polka dots.
Image Source: Kelli at True Bias
Then, I remembered that I'd acquired the perfect fabric to blatantly copy make my own homage at the April Walthamstow Market meet-up from Alana at Lazy Stitching. Bonus - I'd already washed and pressed it, so this weekend it'll be made up! If it goes well, I'll transfer the altered pattern to some pattern card - which'll make it much easier to transfer the marking to fabric, so I can make LOADS to this fab little pattern :)

But, before I cut out the fabric I wanted to ensure I don't "mark the bulls-eye" so to speak over my bust apex, my aim was to avoid "n*pplegate" !

The tools and bits that inspired my "Eureka!" moment
I believe this is a common concern for sewists the globe over no? Well, I had a bunch of bits of paper, sellotape etc. scattered over my desk. And I had one of those "Eureka!" moments....

-----------------------------------------------------------------------------------------
Helping You With Your Fabric Cutting Layout
(SUBTITLE: How To Prevent N*pplegate When Cutting Out Your Patterns!)

How to Avoid Unfortunate Patterned-Fabric
Placement Over Your Bust Point / Apex

 If you like this tip you can pin it here: Pinterest :)

Step 1.
Mark your BP (Bust Point) on your bodice front pattern piece - X marks the spot people!

Step 2. Mark out a rough square about 1½"-2" (4 - 5cm ish) wide centred over the BP. 

Step 3. Cut along 3 sides of the square (I used a ruler and a sharp craft knife). On the last/4th side fold a crease line.

Step 4. Turn the pattern over, so it's face down on the table.

Step 5. Cut a scrap of translucent / see-through tracing paper that's bigger than your square hole. Tape it securely to the back of the hole.

Step 6. Turn the pattern back over again. Hold the little flap of paper back down with your fingers, and then use a tracing wheel to run-over and mark your BP.

Step 7. Lift up the flap, and you should see the indentation marks of the tracing wheel onto your little panel of tracing paper! Mark the BP in permanently with a nice dark pen.

Step 8. You can now lift up the flap and see exactly where your BP lies when positioning it over patterned fabric (yay!).


You could cut off the flap on the top layer (after transferring the BP to the tracing paper below first of course!) - but if you leave it on, it'd make things a bit easier I feel for any future pattern alterations, as tracing-paper can be a bit flimsy :)
-----------------------------------------------------------------------------------------

Back to details of my latest top!
Anywho... for the version I'd been working on this week and last, I'd made a fresh new toile (muslin) to test out my changes. First I made the toile to the same pattern as my collared navy version - only minus the collar. From that I discovered I needed to take out a 3cm tuck all the way down the CF (Centre Front) - as the top now looked baggy 'n' saggy on me.

I sewed the tuck down the outside of the CF, and pressed it then tried it back on - so that if I needed to pinch out more, it'd be easier to pinch + pin when I looked in the mirror.

Then I addressed the tight underarm area. From wearing my navy iteration a lot, I'd realised that an issue I get with a lot of RTW (ready to wear) tops and blouses had translated across to my me-made top. Basically I was getting a load of tight crease marks starting at the front underarm area - pointing up towards my chin. So I dropped the bottom armscye a wee bit (2cm/ about ¾"), and also lengthened the armscye edge of the sleeve pattern accordingly. I also reduced the sleeve width by 2" - as the toile sleeves had some vertical drag lines going on, and they were doing this weird flappy/sticking out thing (not a good look). It looked liked I wanted to take off and fly away somewhere!

Also, the front hem of the bodice now hung weirdly - it seemed to sick out in a tent like formation at the front (perhaps without my now departed tummy flesh there to support it, it was at a loose end?). So, to pull it back in at the hem I increased the angle/depth of my side bust darts - which worked a treat! I unpicked the side-seams on both sides to within about ¼" of the underarm seam-line. I popped the top back on and then used my hand to pinch out a deeper dart, pin it in and see how that affected the drape at the front hem line. I left the upper most dart leg/line alone and only made the lower-dart leg deeper (does that make sense to you? LOL!). I also played around, pinched and pinned the sides at the hemline, and decided I needed to remove another 2"/5cm width at the bottom of my top (or 1"/2.5cm on the pattern piece - as after all the piece is only one half of the whole front of the bodice). I then transferred my new dart legs to my paper pattern. I re-stitched the changes to the same test garment (why waste the fabric eh ;) ?).

NB: The deeper dart meant that there was now a short-fall in the front SS (side-seam) length of 3.5cm. I folded out the new dart on the pattern, measured the seam line and compared it to the back-bodice SS. I've now slashed the front bodice pattern and moved it down by 3.5cm and trued up the SS lines. I trued the SS by folding the dart, temporarily taping it down and placed my ruler from the top of the seam-line at the under the arm, across the folded-down dart, and aligned it to the bottom of the SS at the point where I'd brought the hem width in by 1"/2.5cm), I repeated the process minus the dart (of course) on the SS for the back bodice. There! New SS line was drawn in, and new cutting line at the correct SA (seam allowance) drawn in too :)
I also unpicked one of the "flappy" sleeves, and inserted a new one I'd re-drafted and cut out. Much better! Sleeves no longer flap (it was good to have one arm to compare to the other in the mirror), hem line is not tent like, and front with it's tucked-up tighter CF now looks non-baggy. Interestingly (or not) I didn't need to make any changes to the back bodice at all (aside from the hem width) - maybe all my weight loss happened round the front haha!

So, if things go well I should be able to bang out a few Scouts! Maybe a whole troop (scouts - troops gettit LOL?)

