Pages

Showing posts with label accessories. Show all posts

Monday, 30 December 2013

Crafty Christmas Gift Making - Part II


Dolly for my 2½ year old Niece  Neck Pillow for Grandma
LEFT: Doll for my Niece,                              and RIGHT: Neck Pillow for my Grandma

Further to my last post, I managed to squeeze in some more Christmas gift making last week.

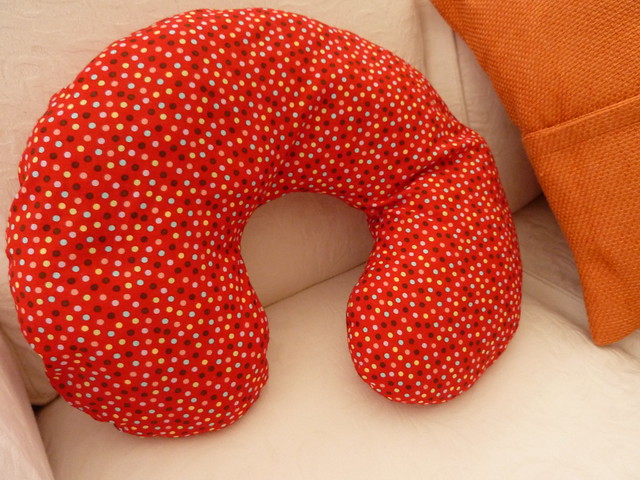
Using a second-hand sewing machine I'd purchased back in summer on eBay (which is now permanently housed at my non-sewing Mother-in-Law's house) I was able to knock-up a quick Neck Pillow for my lovely 98 year old Grandma.

The pattern is FREE from BurdaStyle.com: Neck Pillow 12/2010 #143


The PDF instructions ask you to draft and draw the pattern yourself following a smaller-scale diagram they provide onto a 5 x 5 cm grid of squares. So... being short on time I totally cheated (LOL!); instead I grabbed a screen-shot  of the grid and pasted it into my 'CorelDRAW X3' software, and then I enlarged it to the correct size and I printed the pattern out over 2-A4 sheets of paper = 5mins work and job done!

It took me around 40mins to make (I omitted to add the piping - saving much time) including time to stuff with the innards of an el-cheapo *pillow I'd bought a few years ago at Tesco (*originally destined to be the stuffing in a Duct-Tape-Dummy which I never got around to making haha!).

I also found time to finish-off the Dolly, plus sew a cute dress + knickers for said doll for my 2½ year old Niece (I've been a v. bad Auntie as Dolly had been sitting in a bag sans coiffure since I first started the project as a 1st birthday pressie - eekk, better late than never I guess!).
Wee Wonderfuls - the Kit, Chloe & Louise Pattern
The pattern I used for the dolls is by Wee Wonderfuls - called the Kit, Chloe & Louise Pattern. The PDF includes full details to make the dolls, clothing and hair.

I bought the wool for the dolls hair back in July 2012 from Ridley Road Market. And, because I was pressed for time and I couldn't for the life of me find the original PDF instructions... I used these great tutorials I found to make the "hair" for the dolly: Waldorf Doll Hair Tutorial and Waldorf doll hair: centre back seam clarified by Meike of Crafty Sheep blog

To make the dress I drafted a pattern using paper wrapped/draped around the doll - following the approximate pattern-shapes found in The Itty Bitty Baby Dress Pattern by Made-by-Rae. And, now I have the pattern pieces I can make more dresses easily in the future! The dress is fully-lined, plus I made dolly some jersey-knickers too (so she's properly attired LOL!).

For the doll's face I embroidered the eyebrows in black thread, and the mouth in red. I used some Dylon pens to create the eyes (pressing them on a hot setting to fix-them).

To view more photos of the doll's construction see this Flickr slide-show below :) :



The 3 Boy's Ties I'd made for Hubby's 9 year old Nephew went down very well. He wore the green-one all day on Boxing day (photographic evidence below - although the happy grin on his face might have more to do with playing all-day on an iPad hehe!).


Boy's Ties - Christmas 2013

And Mum-in-Law and Dad-in-Law loved their Tablet-Pillows too.


Sunday, 12 February 2012

So What Do These Singer Things Do Then...?

.
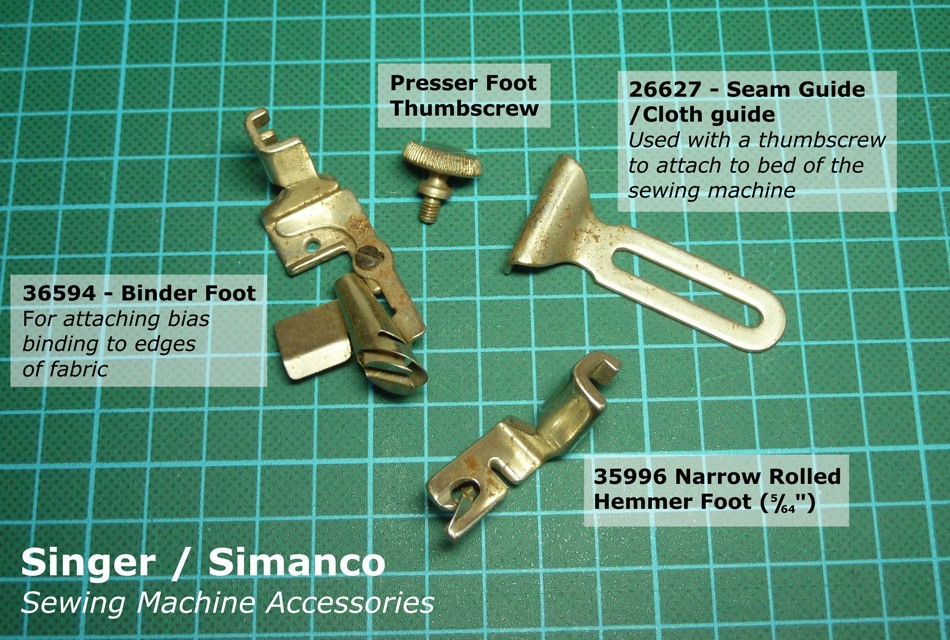
I've been shopping again (yeah I know Quelle surprise!). 2 weeks ago I bought this mixed lot of mysterious Singer 99 sewing machine accessories. The final winning bid price of £6.19 including the P&P ($9.77 USD approx.) was too good to resist, besides it was after work I was tired and sometimes you just need a teenie-tiny retail fix - youknowhatImean?

03 Singer Feet - Bought Feb 2012

I knew what a couple of the items were from the listing photo (the seam guide, binder foot, thumbscrew and the roller hem foot). And I could tell that they are all low-shank attachments (apart from the seam guide and thumbscrew - which are generic in terms of high/low shank machine fitting). Luckily, I have a Low-Shank to High Adaptor to use with them :)


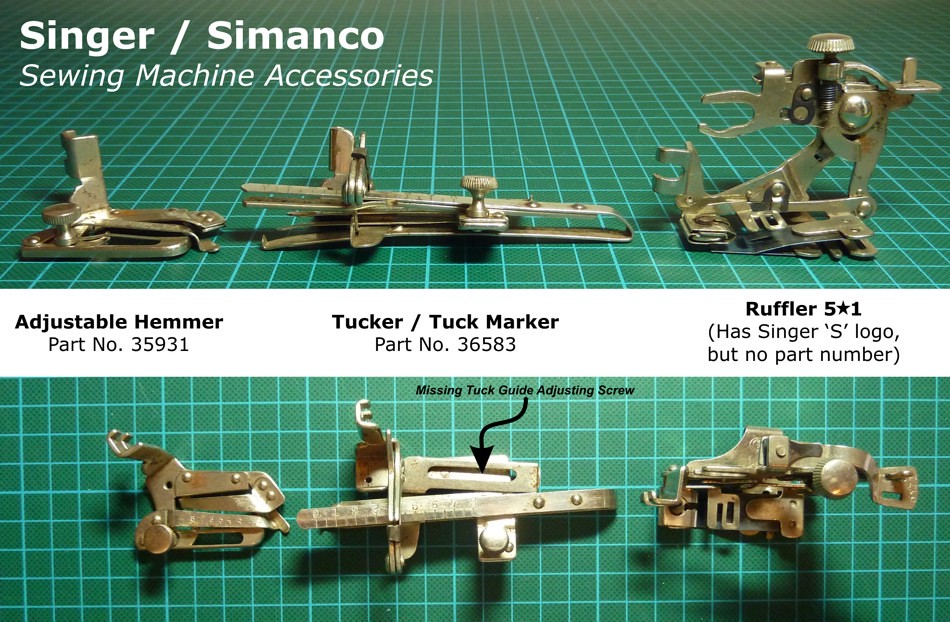
But, there were 3 weird-to-me contraptions that had me flummoxed!  So, here's where the internet and my trusty collection of books came in handy!

I had a quick whizz around the web to check on UK prices for brand-new versions of my 3 "weird" attachments (or even ones in great vintage condition) it seems they're EACH going for around £8 to £16 ($12.50-$25 USD) in the UK, and some in the US are selling for $25-$30 each (eekk! that's £15.80-£19 GBP approx.). So, for £6.19 I've got 5 different feet for a fraction under £1.24/$1.95USD each (that's not counting the 2 extra bits: the seam guide and thumbscrew)... can anybody say B-A-R-G-A-I-N!!


01 Singer Feet - Bought Feb 2012

2 of the 3 mystery attachments had part numbers stamped onto them (apparently Singer parts often have the word Simanco on them along with the part number too). I was able to search for them on the web, and to learn a little about how to use them too. Their real names were: 35931 - Adjustable Hemmer, 36583 - Tucker / Tuck Maker, and Ruffler (though oddly enough it seems rufflers didn't get a part number allocated to them - and there's in fact several different styles of them out there, which confused me a wee bit!).

I then looked up the names of my new attachments in my 2 sewing machine attachment books: The Sewing Machine Accessory Bible by Wendy Gardiner and Lorna Knight and Sewing Machine Attachment Handbook by Charlene Phillips.

Books - Sewing Machine Attachments and Presser Feet

I find the later book by Charlene has better diagrams and explains the different working parts of the attachments better, and it's got a better coverage of those more vintage style presser feet you'll come across. The former book by Wendy and Lorna seems to cover more about modern-day feet - although there is definitely cross over between the two books, I am glad I have both as they both bring something different to the sewing-table so to speak :) I've not read either of them cover-to-cover, I think I'll always just dip into them when I'm trying to figure out how to get a new presser foot to co-operate with me!

Unfortunately, the 'Tuck Maker' is missing it's 'Tuck Guide Adjusting Screw'. I only knew what part it was called because Charlene's book has handy diagrams which label and describe the different parts 'n' do-dads of the various attachments.

I did get very industrious and cut out a bunch of calico scraps ready to try out the 'Ruffler' on different settings (and I was trying to follow the instructions in Charlene's book) sadly it doesn't seem to work (poo!). I guess it could need oiling, as they are pretty rusty. And, that's something else I need to check out - how to clean rust off of vintage attachments without ruing them!

I did come across this nifty YouTube video demonstrating a Ruffler in action though:


Friday, 13 January 2012

Ooo Dear, Rather Than Ooo Rah!

Poor broken sewing machine + Hubby's unfinished wallet :(


Seems not to be my lucky day, I'm pooped and going to bed in a bit :(!


I've been working the evenings this week making Hubby the much-promised new wallet he wanted (his is literally falling apart and ripped to shreds poor luv!). I'm making him Debbie's fab Ooo Rah Wallet Pattern, available on Etsy :)

But, tonight the sewing gods are against me methinks!

1.) I spent ages re-sizing the pattern Wednesday and Thursday night  (Hubby wants a smaller size). But, I still managed to a) cut 1 too many card-slot pieces than I needed & I hate wastage LOL!, and I got some alignments wrong poo!

2.) I picked the wrong fabric for the lining/ inner pieces. It's a v. tightly woven black fabric. And, frankly after trying 5+ different needle sizes (mixture of for 'Wovens' and 'Universal' needles) I realised the error of my ways, but it was too late to change my mind.

3.) Got sticky sellotape all over the clear vinyl (I thought I was being smart using it to hold things in place... it'll tear of easily, or so I thought) - and it took forever too get it off. I spent a good 30mins cleaning it and picking out minuscule bits of tape from underneath each stitch... NOT a happy bunny!

4.)  Nearly melted the vinyl! I washed the I.D. panel after using 'Sticky Stuff Remove' to get off the sellotape residue, and though I'd layer it between paper and iron it dry. Mistake! The vinyl went all soft and nearly shrank... luckily I rescued it (phew!). I was not going to recut and fiddly around with that piece again, no siree!).

5.) I got 3/8" and 1/8" mixed up (I misread my metal Measuring Guide haha!). So, I stitched the fabric tabs on the ends of the zipper at the wrong distance... but if you don't tell Hubby then I won't ;)!

6.) I sewed the zip to the fabric the wrong way up. I managed to get the interfaced side of piece 2. on the outside by mistake - had to rip it out and start again... unpicking small black stitches from black fabric at night is not my idea of fun. And, the bobbin ran out of thread just as I restitched that piece back in.

7.) I went to use my bobbin winder gadget - and the batteries ran out half way through filling it up. On Wednesday, I went to use it with the power lead - I had to use a US-UK adaptor, but I didn't read the US plug which showed an input voltage of 110V (UK is 220-240V) so I burnt it out - poo! Ordered a new one from eBay, right voltage + UK pins on the plug this time (I hope it works!). 

8.) For some strange reason, today Blogger has "lost" the little reply-buttons I'd sent ages figuring out how to do the html-code for into my blog-template. Plus, the new code I added a few days ago has disappeared too (which added numbers against each comment in a little blue box).

And, to cap it all my lovely Novum is broken... wah!! The bobbin thread keeps winding around the insides of my sewing machine and stopping the machine from moving the needle up/down! I keep untangling it but it keeps doing it (it'd only done it tonight - must be the date??). I took out a part that hold the bobbin case (can't find my manual either tonight - so can't remember the name of it) to get to the tangled thread. Got the thread out, put the part back in - but I must've done it wrong, cause the needle will now move down and then stops in it tracks.


So, I'm fed up *sighs* and hope that I have better luck tomorrow!