Pages

Showing posts with label repairs. Show all posts

Monday, 6 July 2015

Say Hello to "Leslie" Folks!


Nope! You're not seeing double folks ! I do indeed own 2 vintage 'Novum New Mark IX' sewing machines. And, you could consider them "Sisters" rather than "Twins".

My two vintage Novum New Mark IX sewing machines.
LEFT:
 Low-Shank model, RIGHT: High-Shank.

My fav machine (on the R) is the High-Shank model (bought back in August 2010 for under £26.01 inc. delivery). On the L is my newer purchase the Low-Shank version. I think that I call her "*Leslie" - I bought her in April 2013 (for £57 inc. postage).

Leslie's Hook timing is out - so she won't stitch, but her light, motor etc. all work just fine.

So, I've printed off a tonne of stuff from the Web and I'm having a bash at fixing her.

Wish me luck!


*Leslie = L for Low, and S for Shank!


Monday, 12 May 2014

"Oil Be Back!"

Alternative Post-Title: "Just a Drop Or 2 Please!"


01 - Sewing Machine Oil - Standard, Small Size Bottle (20ml)

I gave *2 of my sewing machines a good clean, de-linting and oil-up a couple of weeks ago. (*Yeeeeessss I own even more...hehe!)


The recipients of the spring-clean were my beloved vintage, all-metal, super heavy (it weighs 19.8kgs / 43.7lbsNovum New Mark IX - Sewing Machine and my Brother 1034D Overlocker (serger).


Brother 1034D Overlocker (Serger)
Using my mini-vacuum attachments to suck out all the
nasty bits from the insides of the overlocker. 
I posted the photos shown above of my machines mid-clean onto Twitter and Instagram and @ali_goddard asked me on Twitter which oil did I use? So, I decided to share a few of my thoughts on the topic of purchasing sewing machine oil.

If you pop into your local sewing, fabric, quilting or craft store you'll likely encounter one of these small plastic bottles of sewing machine oil (see below). In my experience these are the typical offering in the shops and online stores here in the UK.


Left:  Prym Sewing Machine Oil (Image Source: John Lewis)
Right:  Hemline Sewing Machine Oil (Image Source: Popular Patchwork)

Here are some photos of just such an "average" bottle of oil that I have at home.

Sewing Machine Oil: Standard Bottle 
Typical Size ~ 20ml


01 - Sewing Machine Oil - Standard, Small Size Bottle (20ml)

02 - Sewing Machine Oil - Standard, Small Size Bottle (20ml)
Typical, standard sized sewing machine oil bottle.
The lid unscrews, and you then screw on the long spout/tip
with which to dispense your oil carefully!
Now, if like me you have a vintage sewing machine - then [hopefully] you've read the instruction book and might have noticed that it asks you to oil your machine regularly... my book requests a weekly oiling! I'm guessing that back then, the manufacturers thought a whole lotta sewing was happening each and everyday LOL! Anyway, if you were to oil your vintage sewing machine even on a monthly basis - it's clear to see that you'd soon eat your way through a fair old amount of oil....

...hence why I purchased myself a large, more economical supply. Below, are pics of my Large Bottle: Typical Size ~ 120ml

03 - Sewing Machine Oil - Large Bottle (120ml)

This larger bottle holds 6-times the contents of the smaller, 20ml standard-sized bottles. The metal spout is approx. 10cm/4" tall, and the metal nib can be unscrewed (although I'm not sure of the purpose for that hehe!)

More recently, I purchased for myself a much smaller bottle... in fact it's a Precision Oil Pen, with typical contents of 5ml of oil.


04 - Sewing Machine Oil - Precision Pen (5ml)

05 - Sewing Machine Oil - Precision Pen (5ml)


Needle Length is approx. 25mm/1”.
Total Length is approx. 13cm/51/8”.
1.2mm Diameter Needle Tip.
Needle can be unscrewed to allow re-filling with more oil.

06 - Sewing Machine Oil - Precision Pen (5ml)

The tiny 1.2mm sized tip is what drew me to purchasing the Precision Oil Pen. I had previously been guilty of over-oiling my machine with the standard/large sized bottles (not a good thing as excess oil can attract dust/lint and eventually gunk up your machine, so impeding performance). The tiny tip can dispense very small/fine droplets of oil to precisely where it's actually needed
. This style of oil dispenser is often sold for watch repairers - who work on very small sized machinery and mechanics indeed!

Here's a photo comparison of tip / nib sizes:

07 - Sewing Machine Oil - Precision Pen vs Standard Size Bottle

The Precision Oil Pen tip is approximately x3 times smaller in diameter than the standard/typical 20ml sized "small" sewing machine oil bottle.

Check your sewing machine manual! In regards to [non-vintage] newer machines it's vital to check your user manual / instruction book to find out whether your manufacturer recommends oiling before use. It may seem odd to us non-sewing engineers but many, many modern machines do not require oiling. It seems intuitive that any moving parts where metal moves against, or on another metal part should be oiled, however for new modern machines this is not always the case. Your sewing machine dealer or manufacturer should be able to advise you whether your particular model can or cannot be oiled - and if so, which parts are safe to be oiled (without causing damage to your precious!).

Here's a little table I drew up summarizing my thoughts on these 3 different sizes of bottles:


Shopping... some places to try:
Big Bottles (search for 120ml /150ml size, 'Singer' bottles are often larger too): eBay is great - try
 AlanSews (AlansAlterations)


Precision Oil Pen: eBay again! ClockStoppers seller has some

Standard/Small Bottles: Save on P&P delivery fees and hunt around at your favourite local quilting / sewing / craft shops for Hemline, Prym brand bottles. John Lewis also stock this size of oil too.


Thursday, 10 January 2013

Helen Had It! And, She Has It For You Too...


Disaster averted on the 'Needle Bar Thread Guide' front folks - yay!


03 Needle Bar Thread Guide - Repaired (Jan 2013)

As I should of known the lovely and most helpful Helen Howes had a suitable replacement part over to me in a lickety-split, and best of all it only cost me £1.00 + the P&P ... what's not to love? I bought an extra thread guide (another £1), and a spare presser-foot (£2.50) too - all pre-loved items now finding a new lease of life with my sewing machine :)

BTW I did find the broken piece from the original guide - it somehow landed onto the set of drawers directly beneath the table the sewing machine sits on - v. clever considering the drawers are about 2 ft to the right of the machine and sit flush with the front of table LOL!

The replacement is from a different make and model of sewing machine, but having seen it's photo on her website I was pretty confident it would fit and it does :)

04 Needle Bar Thread Guide - Repaired (Jan 2013)  05 Needle Bar Thread Guide - Repaired (Jan 2013) 


06 Needle Bar Thread Guide - Repaired (Jan 2013)   07 Needle Bar Thread Guide - Repaired (Jan 2013)


08 Needle Bar Thread Guide - Repaired (Jan 2013)   09 Needle Bar Thread Guide - Repaired (Jan 2013)

Helen's small and very friendly service is based in the UK, and she sells all sorts of bits 'n' bobs for vintage sewing machines quote: "Sewing machine parts, manuals, and spares for sale; free advice, and other interesting stuff...". I highly recommend her services - so if you need a part replaced on your favourite vintage-lovely send her an email, check out her site and see what she can do for YOU :) ... and if you can't see what you need... "I keep a Wants list - if you can't find what you want please ask... ".


Friday, 4 January 2013

So, Where's The *Catch Then...?


... ummm weeeellll now.... if you're technically speaking, then it'll be lurkin' on the floor somewhere (not that I haven't tried to find it on my hands 'n' knees already *sigh*).

Don't forget! You've still got 16 more days to enter my GIVEAWAY :) 

02 Needle Bar Thread Guide - Broken (Jan 2013)

Now.... when I say "catch", I mean as in the little metal *catch that you hook your thread around last - just before it passes through the needle. (*Or to give it the full and correct title à la instruction book it's called the 'Needle Bar Thread Guide'.)

I was merrily sewing the teensiest bit of elastic, minding my own business when I heard a sharp "Ping!" and the distinct tinkle of metal. Now, at first I thought "Poo! I've broken a needle!", but nope... the needle was intact.

Then, I noticed that the thread was not lying correctly (see comparison photos above). And I realised that the last part of the thread guide had snapped off. Luckily, the machine still stitches fine - as long as I go slowly.

I also had the sense to remove the needle plate, and to clean the bobbin case, shuttle and race - as I wanted to be sure that the part that had broken off hadn't dropped down inside to jam-up or damage the mechanism (eekk! a horrid thought).
01 - Needle Bar Thread Guide - Broken (Jan 2013)
Diagram scanned from my instruction book - and colour added-in by moi ;)!

So, does anyone know where I can buy a new one, my machine is a vintage model - a 'NOVUM Deluxe IX' (sometimes listed as a 'New Mark IX' too) ? If not, then I guess I could try and fashion one from some narrow wire (the original part has a tight little loop of wire on the end that's attached to the 'Presser Bar' with a little screw.


I think I may send Helen Howes an email with pics to see if she has one for sale


Wednesday, 18 January 2012

My Novum & I Are Back on Speaking Terms...

.


Cleaning the Shuttle Race
Page 25 from the Intruction Book for my *'Novum Deluxe IX' vintage sewing machine

After the jinxed day that was last Friday (LOL!). I finally had time to sit down, clean and oil my favourite sewing machine.

If you recall, she kept tangling thread trapped underneath the feed dogs, and around the shuttle during sewing Hubby's new Ooo Rah Wallet. This meant the machine would stop in the middle of a stitch :(! And, the last time I detangled her the retaining ring and shuttle fell out when I accidentally knocked them as I removed the bobbin and case to get a clear view of the tangling.

Retaining Ring and Shuttle

I kept putting the parts back in correctly (or so I thought): shuttle, retaining ring, then bobbin in it's case. But the machine wouldn't move the needle up/down. It would go down and stay down and not budge. I figured I'd screwed-up the timing or something repair-shop worthy (gulp!). So, after an 'ickle panic on that Friday I decided to go to bed and deal with it in the morning - things always look better in the morning right?

I managed to find the manual - which is now scanned to file for safe keeping too ;). In the first picture at the top above you can see what they say about cleaning the shuttle race section.Can you see in their diagram how they don't show you the position of the shuttle driver (the little banana-shaped thingie)? To slot the shuttle against it correctly (together they form a complete full circle-shape), the driver should be vertically positioned - and to the left-hand side. I had been slotting everything back together with it on the bottom (doh!).

So, I turned the hand wheel towards me, got shuttle driver positioned just right and put all the other parts back inside together - and bingo! The needle moves correctly again - PHEW!!

Here's a few photos of the insides – they’re here, so that if nothing else I can remember how to dis- and re-assemble things again for future. No more mis-aligning things for me please! I rested her on some bits of old cardboard box - 'cause she's heavy and the metal would scratch and damage my table top otherwise, plus it's good for catching any oil-spills too!

01 - Start and End 02 - Levers out
01 - Start and End position                               02 - Turn levers out
03 - Remove Retaining Ring 04 - Remove Shuttle
03 - Remove Retaining Ring                               04 - Remove Shuttle

Whilst I had Ms. Novum out of her plastic base and her parts exposed (no sniggering at the back please!), I thought the least she deserved was a clean up and oil.

Underside of the sewing machine

I cut up some small pieces of J-Cloth, because it's lint-free and won't leave deposits of loose fibres everywhere. After all, no point in cleaning out old lint and dirt to leave behind new clean-dirt is there? It'd defeat the point.

I also used some neat little tweezers I had - with a narrow/bent tip. I could fold up the small scraps of J-Cloth into a pointy triangle, dabbed some sewing machine oil onto them (not to much!) and really dig into all those nooks and crannies.

Tweezers to clean in the tiny spaces

To be fair, she had very, very little dirt and barely any lint on her. With the tweezers there practically wasn't a spot I couldn't reach; and I got in and around the feed dogs nicely too.

I even found her serial number during the clean-up (I never noticed it before) - it's on the underside.

Serial Number

After her oil up 'n' clean she was running smoother than before - and I managed to finish Hubby's wallet too.


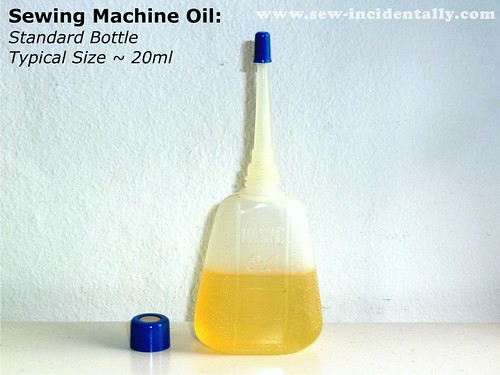
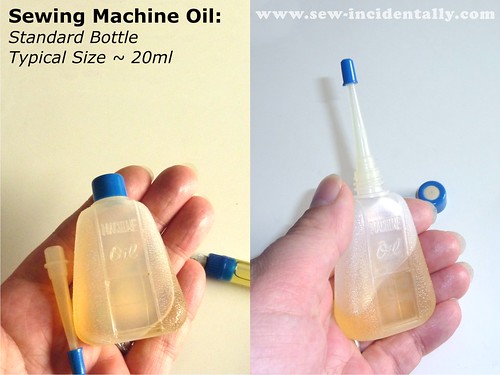
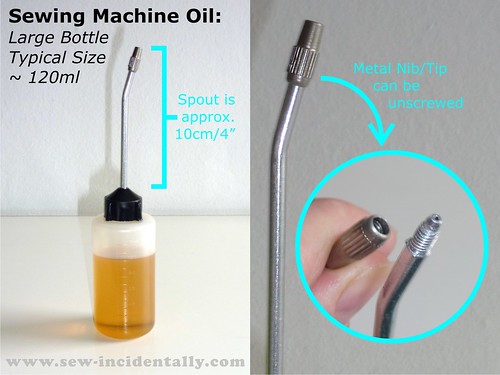
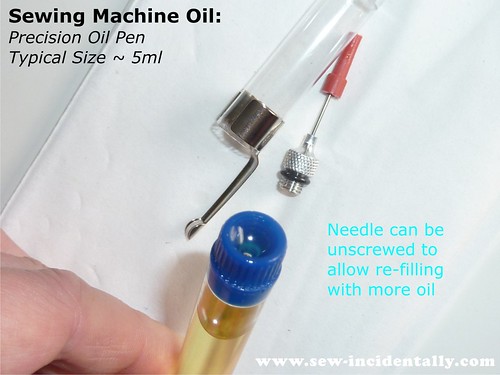
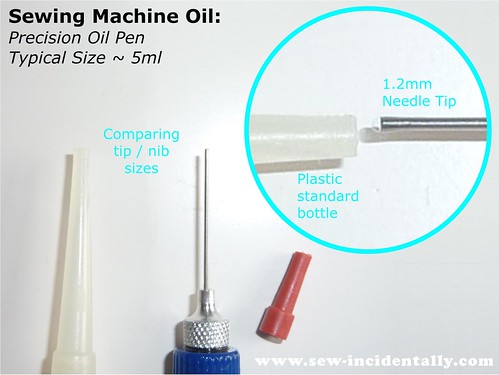
TIP: I have a habit of knocking over things. So, I keep my small bottle of oil in a old clean plastic tub (an old Vanish Detergent tub 1.5kg size - because it's pretty tall). So, the oil lives in something that'll catch any drips/spills - and that tub lives hidden away inside the big drawers in my IKEA Expedit bookshelves. When I use the small bottle I pop it into a pencil pot on the table - that way I'm less likely to knock it over there too. I have a large bottle of oil I use to top up the small one - they live together in the plastic tub. The large bottle works out way cheaper per ml, but the small bottle (same size you get in the shops like John Lewis, etc.) are far easier to hold in your hands and manoeuvre around the machine parts that need the loving care and attention :)


  Image Source: MySupermarket.co.uk

I use an empty Vanish Tub (1.5kg) to keep
my sewing machine oil bottle - so it's safe from spills!


*Sometimes also known as a 'Novum New Mark IX'


Friday, 22 April 2011

Sewing Machine Surgery

... of the cosmetic kind LOL!
Image Source: Amazon.com


Disclaimer: Electricity is dangerous stuff - fact! This post is in no way a tutorial, or a set of instructions on how to carry out alterations or repairs to your sewing machine(s) or other electrical appliances. I do not accept any responsibility or liability whatsoever for any losses, damages, injuries, accidents (or any other outcomes) to persons, possessions or to property as a result of anyone reading my post (or my photographs/images) who has then duplicated in full (or in part) my alterations (as shown here and/or elsewhere) upon their own (or upon someone else's) equipment. Persons who do so, do so entirely at their own risk and liability. Electrical work and repairs should always be carried out by an appropriately qualified, registered and insured professional.

One of my machines is a lovely sturdy Novum Deluxe IX (sometimes also known as a 'Novum New Mark IX'), a zig-zag model built from a solid metal frame (and *less-than-sturdy plastic base). But unlike my modern Brother sewing machine she has no power-switch, so once her power cable is plugged into the mains electricity she is "on" all the time, and I have to crawl under the table to turn her off. I don't like to leave her switched on when I'm not using her - this is because I reckon the bulb must be pretty old and I don't want it to burn out on me from over use (plus then I don't have to hunt down a new bulb to fit it hehe!). Also, where the power lead (a **Janome make lead) slots into the pins on the machine it tends to be a little loose - so if I adjust the positioning of the foot pedal on the floor then the power lead tends to "ping" out of the machine = most, most annoying. And, lastly whenever I seem to plug her into the sockets at home the lead is never long enough, and I end up with a massive spaghetti junction of cables and extension leads going on which a) looks ugly, and b) is a tripping hazard!


03 - Old cable set up
 My old power cable / lead - too short for my needs!

So, a few weekends ago with the help of my sexy 'n' gorgeous assistant (aka Hubby) I decided to address these issues in one fell swoop. So, a little shopping trip in the electrical section of my local Wilkinson's store and ***Maplin's and a rummage in the tool box at home yielded me all the supplies and materials I needed. For the princely sum of £6.29 GBP/$10.40 USD (or more precisely £5.00 / $8.25 if you count cost per unit for multiple items in a packet) I upgraded my machine a little :)


01 - Tools and Supplies 01 02 - Tools and Supplies 02
Tools & supplies I used for my DIY


My plan?
(1) Add an in line on/off toggle switch to the power lead.
(2) Lengthen the lead between the mains socket plug and the machine.
(3) Lengthen the lead between the machine and the foot pedal.
(4) Change the mains socket plug for a new one, and update the fuse too.

Here's a few pics of what I did (loads more on Flickr).
NB: I've not shown how to re-wire a UK mains plug, as there are plenty of DIY books/stuff on the web to show that already :) I simply wired up the new mains-lug and changed out the 13A fuse it came supplied with for the 3A fuse I'd bought.


04 - Positioning the new switch 05 - Positioning the new switch 42 - New power switch in place

It took me about 2 hours of fiddling around with wires 'n' dinky little screws etc. (I reckon if I hadn't of been photographing the process as I went along then it would've been half the time).

I'm very pleased with the finished look, and it's sooooo much easier to use her now too :) The first time I turned her on post-surgery the light came on (you cannot independently turn off the bulb) but the motor didn't work when I used the foot pedal (nooooo!). I checked all the wiring (all ok, nothing loose), then I checked the inside of the pedal - and I realised that the metal-copper widget attached to the upper part of the pedal casing was meant to slide up/down against the metal coil of the transformer (house on the lower/bottom part of the pedal). So, when I slotted the pedal back together post re-wiring I had omitted to connect the copper part back properly (doh!). I amended my error easily and bingo - she lives!


Alternative way to lengthen cables/leads
If you don't fancy opening up the pedal and fiddling around inside (I don't blame you it's time consuming and tricky to boot!), then maybe this would be easier, safer and quicker instead?
(1) Buy some new cable + an in-line Terminal Cable Connector block
Cable Connectors
(2) Cut the old lead no less than 10-15cm (4"-6") from where it enters the pedal. (You can cut it anywhere along the cable - just not too close to the pedal or it will be to awkward to work with!)
(3) Strip wires (see how in my Flickr photos), and attach the short end to the inside of the cable-connector. (One colour or cable goes into each of the 3-different metal terminals inside of the connector).
(4) Next, strip wires from one end of your new cable.
(5) Attach the exposed wires from the new longer cable, to the terminals inside of the Cable Connector.
(6) The new cable is attached to the empty terminals (the ones on the opposite side to the cables/wires from your old cable - which is still attached to the pedal). It is vital that the colours are matched-up: BLUE with BLUE (NEUTRAL), BROWN with BROWN (LIVE), and GREEN/YELLOW with GREEN/YELLOW (Earth). If the colours are mis-matched it could be dangerous, the motor may stop working, or some one'll get hurt!!
(7) Screw shut the top of the cable connector.
(8) Attach the raw end of the new cable to the plug that goes into the back of your Sewing Machine motor (see photos 7-14 in my Flickr set).
(9) Bingo now there's a longer cable to your foot-pedal!

Repeating the above steps to lengthen the cable between the machine and the mains plug would work too! 

The connectors cost under £3 from hardware stores (e.g. Wickes) or they are cheaper on eBay.


Here's the full slide show - all 42 glorious technicolour images (there's text in the "Set" version vs. the slideshow one)


Sewing Machines - How They Work / Other DIY Repair Links:
Oh, and I found some other interesting Sewing Machine Repair/DIY sources of information that might come in handy for me in the future below too :-
How to repair your sewing machine at home? (A couple of pointers)
Replace Foot Control (Video)
How to install a cord on a sewing machine's foot control (Video)
And re: working with Capacitors (which can be dangerous!)
QUOTE: "Since capacitors can store electrical currents for an indefinite period of time even if it is not hooked up to any power source, then a capacitor can be extremely dangerous when not discharged correctly. So if for some reason you will need to have the capacitor uninstalled or removed, it has to be discharged properly and completely. This is so accidental electrocution which could be potentially fatal to you can be avoided." QUOTE


*When I purchased her from eBay she had to be shipped to me from the North of England to my home address in London. Sadly, due to lack of bubble-wrap her plastic base became badly cracked and pieces have splintered off boo! She still rests on the base and is usable (although I have to be extra careful when I pick her up & move her around or the base falls off LOL!) - but it looks none too pretty and I'm looking to replace the base and the carry case-lid at some point in the future. The seller placed her directly onto the bottom of a nice strong cardboard box, but there was no padding underneath her - so every time her 19.8kgs mass (43.7lbs) was jostled or bumped around during transit then those knocks transferred straight to her case and hence the damage :(
**Presumably the machine came brand new from the factory with a "Novum" branded power lead and foot pedal, so I guess that at sometime during her lifetime the lead was replaced with the current Janome one?
***Nope - NOT the fictional retro holiday camp of BBC TV fame ("Hi-de-hi!!!" LOL)