
.
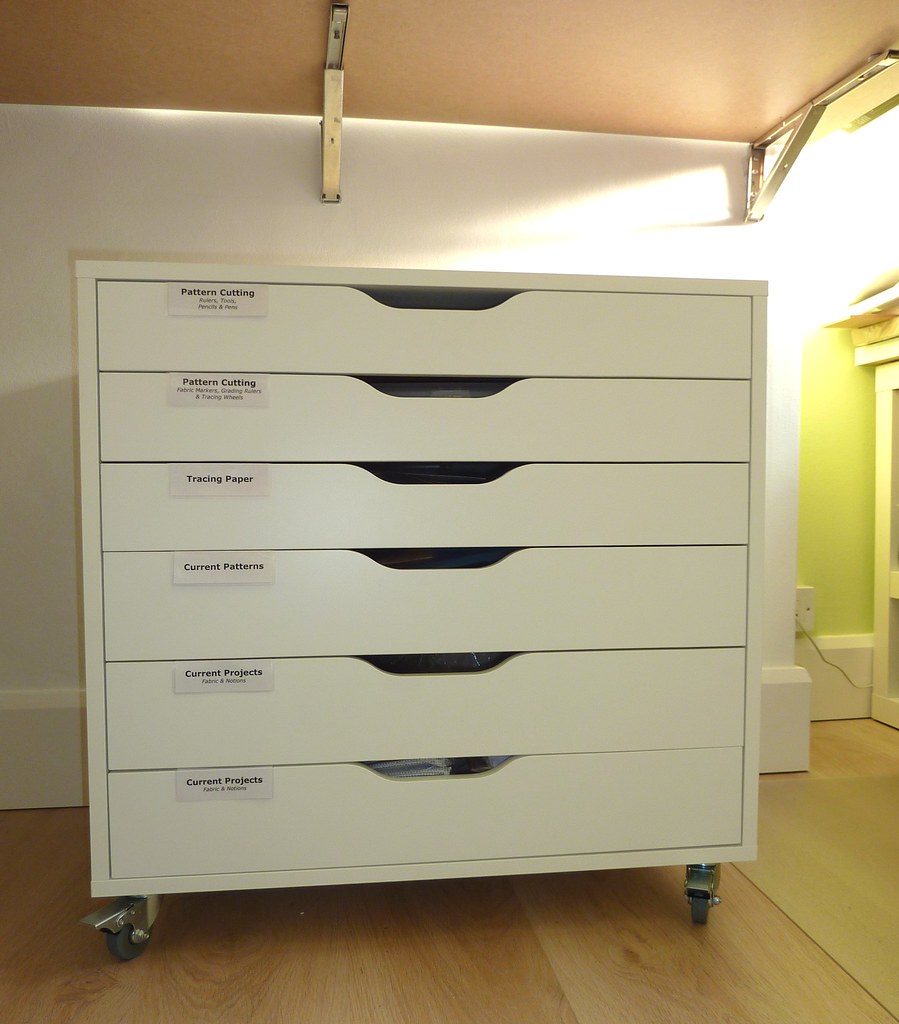
Following on from my last post... here's my tutorial explaining how I joined the 5th + 6th drawers on my together on my IKEA: ALEX Drawer Unit.
Why would I want to mess around with my furniture? Well to quote my post from yesterday...
How did I achieve this? Ahhh easy peasy! All it takes is some mending plates, and some woodscrews to create a single deeper drawer - perfect for me to store my current projects in progress. Plus, it was very simple and cheap to do - and no special skills required!
-----------------------------------------------------------------------------------------
How to Join 2-Drawers Together...


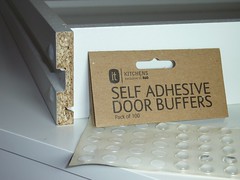
(9) [OPTIONAL] Apply self-adhesive door buffers to the back of the drawers - to ensure that when you shut the drawers you don't get any bumps, or banging noises.
STEPS
[Applicable for the IKEA ALEX Drawer Unit.]
(1) Make-up and assemble lower drawer as per instructions.
(2) Assemble upper drawer, and leave out the base/bottom (you can always label it, and store it safely should you ever want to change the drawers back to normal).
(3) Insert drawers into unit, and bolt into place (see steps 15,16,17 of the IKEA assembly instruction PDF). Don't over tighten the bolts at this stage - you WILL need to loosen them later on.
At IKEA
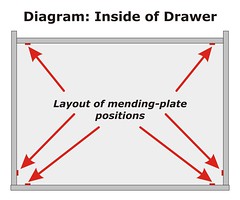
(4) Pull out the lower drawer only. On the inside of the lower drawer - use your pencil to mark the centre position of the mending plate hole. Do this for all 6 mending plates. You want to position the plates along the drawer-front, near to the front (1 each side: left and right), and the same along the back.
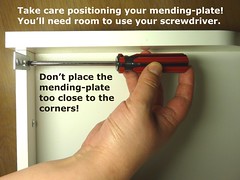
NOTE: Do not position the plates right into the corners - you simply won't have enough room to hold and use your screwdriver, and you'll just make the work harder for yourself. If you do get the plates to close to the corners it restricts your hand movements, and the screws will more likely than go in at an angle. Wonky screws are not as effective, or as strong as correctly inserted ones LOL!
(5) Use the bradawl to make a small indent into all of your pencil marks on the lower drawer. Hold the draw steady with one hand, and use the other to press the bradawl carefully, and firmly into the sides of the drawer. (If you find it tricky to make the dent use a hammer to lightly, but firmly tap on the end of the bradawl - you may want to ask a friend to help hold the drawer steady whilst you hammer-away!)

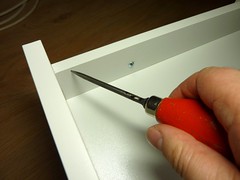
The indent is there to help the pointed-tip of the screw find the right starting spot! This stops the screw from sliding around and out of position.
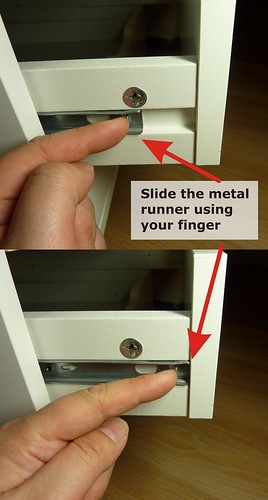
You may find that you need to undo or loosen the retaining bolts that attach the drawer-sides to the metal runners. This will allow you to bring the drawer further forward in order to reach the back-wall of the drawer. Remember to re-insert the bolts after Step 6!
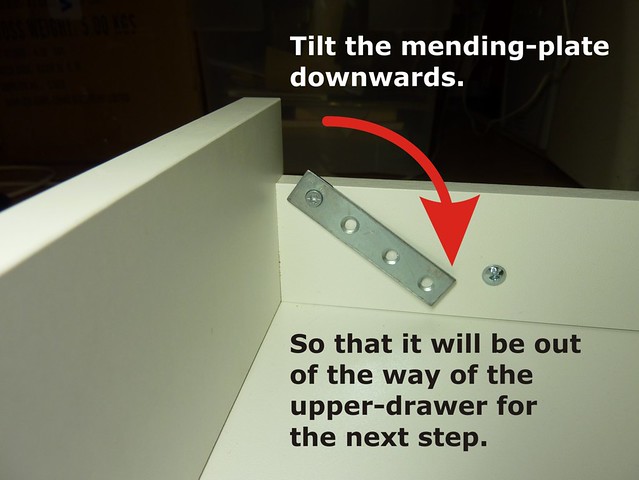
(6) Screw the bottom hole of the mending plates onto all 6 places on the lower drawer. Don't worry about keeping them upright - just screw in the bottom hole, and then turn the plate down towards the bottom of the drawer (this means you can slide the upper-drawer out easily without hitting the half-attached plates!).
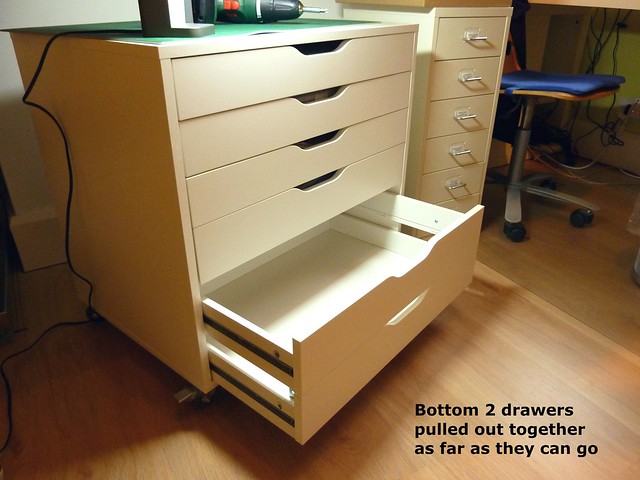
(7) Now, make sure both the upper, and lower drawers are pulled out together. You want them pulled out as far as they will go. The metal runners will stop them falling off of the end, and they'll both stop together at the same point - nice and level.
(8) Tilt the mending plates back up into position so that they overlap the insides of the upper drawer. Mark the centre of the top hole on the plates.
(9) Tilt the plates back down, and slide the lower drawer back into the unit. Working on just the upper drawer, bradawl the marks for the screw-holes. (Again, you may want to loosen those retaining bolts on the sides of the drawers connecting to the metal runners, just for the bradawling part - but, remember to put them back when you've finished this step!)
(10) Pull the lower drawer out again so that both drawers are out as far as they can go. Tilt the plates back into position and screw them in firmly.
Your all done!!
OPTIONAL: Use pieces of hardboard cut to size to fill in the gaps along the inside drawer-sides, and back (cut them, so that they cover the full height top-bottom). I don't think this is vital for me personally, as I don't think anything will drop in between the gaps. Similarly, the gap at the front of the unit between the drawers is minimal - so it doesn't worry me.
If you feel otherwise, then you could cut down some hardboard (slice with craft knife and a metal ruler - take care!) and stick it onto the inside with double-sided tape... it'd make it easier to convert back to 2-drawers later on should you ever change your mind rather than gluing/nailing/screwing it in. You may even decide to attach the hardboard first, and then attach your metal plates over the top - however, it'll be harder work to screw through the extra layer!
WARNING:
*It's funny screws are more often than not sold in the UK according to their length in inches, not in metric/mm. And, yet the gauge, or thickness/diameter is given in terms of a "g" (gauge) measurement. The length whether the screw is countersunk style, or say pan head refers only the the length of the screw that becomes fully inserted into the wood - and NOT to the length from end-end of the screw itself. If you're very geeky (like me LOL!) you can read more about screw sizes here, here, and here.
Why would I want to mess around with my furniture? Well to quote my post from yesterday...
"I wanted a place to neatly store projects in-progress, i.e. cut-out fabric for half-finished garments etc. . And, even though the bottom drawers are slightly deeper than the top-3, I needed more space than they were able to give as provided. So, seeing as this unit is flat-pack assemble it yourself stuff I simply choose to omit the hardboard base/bottom from the 5th-drawer down."
How did I achieve this? Ahhh easy peasy! All it takes is some mending plates, and some woodscrews to create a single deeper drawer - perfect for me to store my current projects in progress. Plus, it was very simple and cheap to do - and no special skills required!
-----------------------------------------------------------------------------------------
How to Join 2-Drawers Together...
If you fancy making a similar mod to some flat-pack drawers here's how I did it.
| Tools/Equipment: | Supplies/Materials: |
• Pencil • Bradawal • Tape Rule / Ruler • Crosshead Screwdriver Optional: • Hammer (to assist with bradawling) • Drill • Drill Bit, 2mm / 5/64") (optional to pilot holes on drawer fronts) | • 12x of 6g, ½" countersunk wood screws (crosshead/ pozi-drive) • 6 flat, metal mending plates 75mm (approx. 3") or longer |
TIPS:
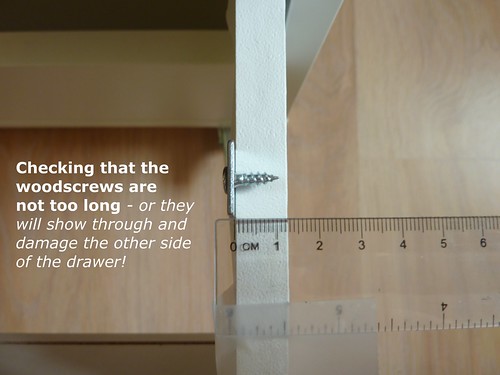
(1) Make sure that your screws are not too long to go through and out of the other side of the drawer-sides! My IKEA drawers-sides are 12mm thick (a smidgen under ½") so my *½" screws + the thickness of the metal on the mending plates means the screws will "just" be this-side of okay.
(2) Use crosshead woodscrews - not slot-headed ones. The crosshead screws (some will be labelled pozi-drive on the packaging too), are much easier to screw in than slot-headed screws, which have a tendency to allow the screwdriver to slip out suddenly.

(3) Check the distance the mending plate needs to reach to bridge the gap between the 2 drawers you're joining together - so you buy the right size. You don't have to buy the straight-line style I used, if a different shape (they sell T, and L's for different purposes too) is long enough to do the job then go for it! The plates I've used are 75mm long (3" approx.).

(4) Position the mending plates carefully so that the holes are NOT aligned with any metal runners, or other hardware. You don't want to interfere with the smooth action of the drawers and make them warped or get stuck suddenly and jam.

(5) Just screw each plate once at each end. You don't need to screw every single hole on the mending plate, one at end end to attach it to each drawer is plenty!
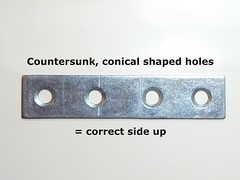
(6) Use the correct side of the mending plate. Once side has a flat edge to the holes, the other is almost cone-shaped. It's the cone-shaped side of the holes that need to be visible - they fit very snugly with the countersunk screws to make a proper fit.
(7) If you're working on drawers with hardwood sides then you'll need to use the drill to pilot very small, shallow and narrow holes after you've marked the holes that the screws go into. Hardwood is just too tough to screw into without piloting first! Note, that this piece of IKEA furniture is made from particleboard aka chipboard, and for a very short ½" length woodscrew it's quite straightforward to screw in successfully by hand without the need for piloting/drilling beforehand.
(8) [OPTIONAL] Use silicone spray on the metal runners - BEFORE you attach them to the drawer sides. Once the drawers are in place it'll be very hard to access them easily to spray. The spray will help oil-up the drawers so they run more smoothly for you. Have some tissues, or kitchen paper handy to wipe up any excess/spillages. Silicone spray is clear, and colourless so it should not stain or discolour your drawers (it certainly has done so on mine!).
(1) Make sure that your screws are not too long to go through and out of the other side of the drawer-sides! My IKEA drawers-sides are 12mm thick (a smidgen under ½") so my *½" screws + the thickness of the metal on the mending plates means the screws will "just" be this-side of okay.
(2) Use crosshead woodscrews - not slot-headed ones. The crosshead screws (some will be labelled pozi-drive on the packaging too), are much easier to screw in than slot-headed screws, which have a tendency to allow the screwdriver to slip out suddenly.
(3) Check the distance the mending plate needs to reach to bridge the gap between the 2 drawers you're joining together - so you buy the right size. You don't have to buy the straight-line style I used, if a different shape (they sell T, and L's for different purposes too) is long enough to do the job then go for it! The plates I've used are 75mm long (3" approx.).
(4) Position the mending plates carefully so that the holes are NOT aligned with any metal runners, or other hardware. You don't want to interfere with the smooth action of the drawers and make them warped or get stuck suddenly and jam.
(5) Just screw each plate once at each end. You don't need to screw every single hole on the mending plate, one at end end to attach it to each drawer is plenty!
(6) Use the correct side of the mending plate. Once side has a flat edge to the holes, the other is almost cone-shaped. It's the cone-shaped side of the holes that need to be visible - they fit very snugly with the countersunk screws to make a proper fit.
(7) If you're working on drawers with hardwood sides then you'll need to use the drill to pilot very small, shallow and narrow holes after you've marked the holes that the screws go into. Hardwood is just too tough to screw into without piloting first! Note, that this piece of IKEA furniture is made from particleboard aka chipboard, and for a very short ½" length woodscrew it's quite straightforward to screw in successfully by hand without the need for piloting/drilling beforehand.
(8) [OPTIONAL] Use silicone spray on the metal runners - BEFORE you attach them to the drawer sides. Once the drawers are in place it'll be very hard to access them easily to spray. The spray will help oil-up the drawers so they run more smoothly for you. Have some tissues, or kitchen paper handy to wipe up any excess/spillages. Silicone spray is clear, and colourless so it should not stain or discolour your drawers (it certainly has done so on mine!).
(9) [OPTIONAL] Apply self-adhesive door buffers to the back of the drawers - to ensure that when you shut the drawers you don't get any bumps, or banging noises.
STEPS
[Applicable for the IKEA ALEX Drawer Unit.]
(1) Make-up and assemble lower drawer as per instructions.
(2) Assemble upper drawer, and leave out the base/bottom (you can always label it, and store it safely should you ever want to change the drawers back to normal).
(3) Insert drawers into unit, and bolt into place (see steps 15,16,17 of the IKEA assembly instruction PDF). Don't over tighten the bolts at this stage - you WILL need to loosen them later on.
 |
| IKEA ALEX Drawer Unit - assembly steps 15, 16 and 17 |
At IKEA
(4) Pull out the lower drawer only. On the inside of the lower drawer - use your pencil to mark the centre position of the mending plate hole. Do this for all 6 mending plates. You want to position the plates along the drawer-front, near to the front (1 each side: left and right), and the same along the back.
NOTE: Do not position the plates right into the corners - you simply won't have enough room to hold and use your screwdriver, and you'll just make the work harder for yourself. If you do get the plates to close to the corners it restricts your hand movements, and the screws will more likely than go in at an angle. Wonky screws are not as effective, or as strong as correctly inserted ones LOL!
(5) Use the bradawl to make a small indent into all of your pencil marks on the lower drawer. Hold the draw steady with one hand, and use the other to press the bradawl carefully, and firmly into the sides of the drawer. (If you find it tricky to make the dent use a hammer to lightly, but firmly tap on the end of the bradawl - you may want to ask a friend to help hold the drawer steady whilst you hammer-away!)
The indent is there to help the pointed-tip of the screw find the right starting spot! This stops the screw from sliding around and out of position.
You may find that you need to undo or loosen the retaining bolts that attach the drawer-sides to the metal runners. This will allow you to bring the drawer further forward in order to reach the back-wall of the drawer. Remember to re-insert the bolts after Step 6!
(6) Screw the bottom hole of the mending plates onto all 6 places on the lower drawer. Don't worry about keeping them upright - just screw in the bottom hole, and then turn the plate down towards the bottom of the drawer (this means you can slide the upper-drawer out easily without hitting the half-attached plates!).
(7) Now, make sure both the upper, and lower drawers are pulled out together. You want them pulled out as far as they will go. The metal runners will stop them falling off of the end, and they'll both stop together at the same point - nice and level.
(8) Tilt the mending plates back up into position so that they overlap the insides of the upper drawer. Mark the centre of the top hole on the plates.
(9) Tilt the plates back down, and slide the lower drawer back into the unit. Working on just the upper drawer, bradawl the marks for the screw-holes. (Again, you may want to loosen those retaining bolts on the sides of the drawers connecting to the metal runners, just for the bradawling part - but, remember to put them back when you've finished this step!)
(10) Pull the lower drawer out again so that both drawers are out as far as they can go. Tilt the plates back into position and screw them in firmly.
Your all done!!
OPTIONAL: Use pieces of hardboard cut to size to fill in the gaps along the inside drawer-sides, and back (cut them, so that they cover the full height top-bottom). I don't think this is vital for me personally, as I don't think anything will drop in between the gaps. Similarly, the gap at the front of the unit between the drawers is minimal - so it doesn't worry me.
If you feel otherwise, then you could cut down some hardboard (slice with craft knife and a metal ruler - take care!) and stick it onto the inside with double-sided tape... it'd make it easier to convert back to 2-drawers later on should you ever change your mind rather than gluing/nailing/screwing it in. You may even decide to attach the hardboard first, and then attach your metal plates over the top - however, it'll be harder work to screw through the extra layer!
WARNING:
You need to be very CAREFUL when screwing the plates along the inside of the drawer-fronts
because a) it'll show through anything other than a small horizontal gap between the 2-drawer
and that'd be visible/ugly, and b) if you get your screws too long, or you screw through too
deeply then the tip of the screw will break through and ruin the surface (ask me how I know
this from past experiences :( !)
*It's funny screws are more often than not sold in the UK according to their length in inches, not in metric/mm. And, yet the gauge, or thickness/diameter is given in terms of a "g" (gauge) measurement. The length whether the screw is countersunk style, or say pan head refers only the the length of the screw that becomes fully inserted into the wood - and NOT to the length from end-end of the screw itself. If you're very geeky (like me LOL!) you can read more about screw sizes here, here, and here.


.JPEG)


.jpg)


Thanks for an interesting post! I never knew that about the lengths of screws.
ReplyDeleteyou have to post this on Ikea Hackers
ReplyDeleteOh, I have heard of that site *nods*... maybe I shall post it there sometime - still gotta fit in more sewing time first though ;) LOL!
Deletehi!, how can to remove the drawers?, thank u
ReplyDeleteHi, I don't understand your question... are you asking how to remove drawers from the unit please? If that is your question then I would suggest simply following the IKEA instruction leaflet (that comes inside the cardboard box with the drawers) in reverse-order to remove a drawer. You can download a PDF file copy of the IKEA instructions from this webpage: http://www.ikea.com/assembly_instructions/alex--drawer-unit-on-castors__6D7M03_PUB.PDF . I hope that helps you ? :)
DeleteI know this is an old blog post but im wondering if you have the depth of the drawers of this unit? The top three depth, depth of the 4th drawn down, and depth of the Bottom drawer once the two last drawers are connected?
ReplyDeleteIt would be super helplful! Thanks!
Janna
@jannacookie Here goes (all measurements are in mm - and are to the top edge - totally level with the drawer-front edge):-
ReplyDeleteTop 3 drawers: 67mm.
4th drawer down from the top: 87mm
Bottom drawer (2 drawers combined into 1): 190mm.
I hope that, this helps :-)?