
Picture heavy post coming below peops... if nothing else - it serves as an excellent visual reminder for me - as I need to make-up the plain black cotton version of this top... as I've already cut out the fabric LOL!
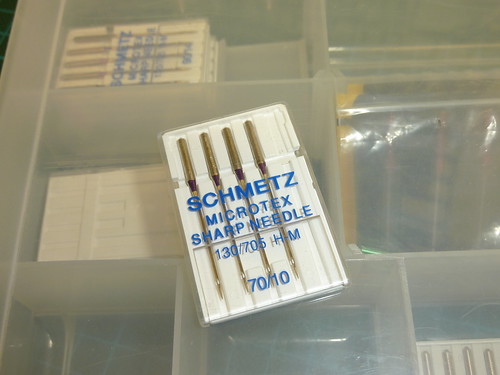
Following on from my last post I ran some test samples on my sewing machine - as I was concerned that it might chew up the lightweight flimsy fabric. I used a Microtex needle (so it's nice and sharp!) - and my vintage machine has the ability to lower the feed-dogs for Normal - Silk - Embroidery fabric. The last setting basically lowers the feed-dogs completely out of the way so the fabric can be moved around freely at will. SIDE-NOTE: That's a pretty handy feature if you're using a Buttonholer attachment, as it can save the need for an extra plate to cover any feed-dogs that cannot be lowered out of the way. With a Buttonholer the attachment itself grasps onto the fabric and moves it around as the buttonhole is stitched - therefore it needs the fabric to not move along with the sewing machine's feed-dogs.

The straight stitch samples came out best on a fairly long stitch length, with the top-thread tension reduced a little, and the feed-dogs lowered to the Silk setting. I also preferred the nicer stitch formation I got using my straight-stitch foot and straight-stitch needle-plate (the plate was another excellent purchase a while back from the ever-handy Helen). I find that with that plate I can only use the machine with the needle-positioned to the far left - otherwise the needle would break when it misses the tiny narrow hole... ask me how I know !!?!.
I also tested the overlocker (serger) using 4 large spools of nicely matching grey thread I picked up IIRC at William Gee in Dalston. I had tried the tie-on method of switching over the threads... but only the left-needle worked! All the others got jammed and caused the thread to break. Anyhow... it's so easy to thread my machine I don't need the instructions anymore - just a pair of tweezers and some good lighting LOL!
Then, having examined the construction of the original (i.e. nosing around inside!) I could see that the majority of seams were overlocked together. I also observed, that to create the small, but simple side-vents (splits?) I'd have to overlock the front and back side-seams on both the front and back bodices from the hem-upwards for about 11cm (4½") - that's the length of the vent + extra at the very bottom for the turn-up of the hem-allowance + a bit extra above where the top of the vent ends. The idea would be to then straight-stitch the side-seams (SS) and the integral but short underarm seams together - stopping at the point where the top of the vent should be. The overlocked edges of the vent are then pressed to the inside of the garment along the same width as the 1cm (3/8") SS - and then they are topstitched in place about 7mm (¼") from the edge. After that the hems can be overlocked, pressed and then straight-stitched into place.
So, to pre-overlock the vent/side-split edges I did the following:
(1) Marked the where the top of the vent is (the same place the side-seam ends/where the split-opening finishes).
(2) Marked the level at which the SS will end-up overlocked together - then clipped from the edge of fabric inwards at this level stopping at the point where the finished fabric edge will finally be (NB: for this delicate lightweight crepe fabric I cut the pattern pieces wider than the final).
(3) I then folded the fabric above the clip in towards the middle of the bodice, and pinned it out of the way. (It will be out of the way of the overlocker blades.)
(4) Then each of the 4 vent/side-split edges are overlocked (4 = 2 sides on the Front Bodice, 2 on the Back Bodice) - tailing off the threads at the point where the upper fabric of the bodice is folded out of the way.


I was then ready to straight-stitch the shoulders together - but this fabric is flimsy and fiddly to handle, so I pinned and then hand basted it together to get an easier to manage machine-stitch result. After the straight-stitching I pressed the seams, then overlocked them.
Next, I straight-stitched the side-seams. Starting from the curved area of the underarms working down towards the hems. I stopped to back-stitch very carefully at the point where the top of the vent opening starts. Luckily there's a tiny overlap of the fusible stay tape at that spot to reinforce the stitches - as I was concerned that it could be a stress point and tear through when worn (eekkk!).
Then, I needed to overlock the side-seams. However, I was concerned about my iffy ability to negotiate a tight curve on the overlocker - with out fluffing it up big-time and slicing something off with the blades irretrievably. So, I first carefully cut along the cutting-line of the underarm curve and also about a further 3 - 4cm worth of the vertical-line (see photo below) and then I stopped. I figured this would make it easier for me to manipulate the fabric around a curve when I overlocked the side-seams.

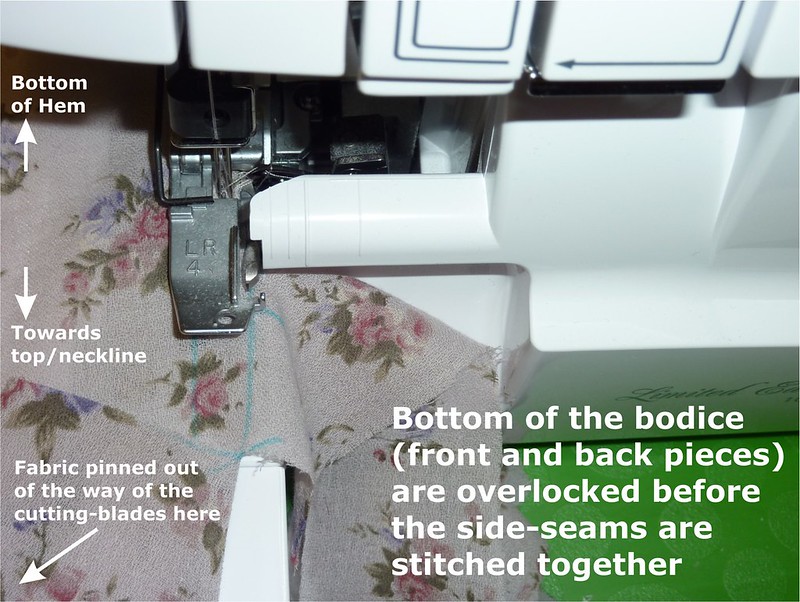
 When I got close to the top of the vent opening (which I had marked off with water-erasable marker at point about 5 - 6cm above the top of the actual opening) I needed to overlap the overlocking stitches with the pre-overlocked section. It's here, that the pre-cut, pre-overlocked edges of the vent seam allowances meet up with the overlocker blade-edge as it passes through the machine towards the needles. I overlapped both sections of overlocking a little bit before trailing off the threads gently to the side (see photo below).
Okay, so far the shoulders are sewn up, as are the vents/splits, and the side seams - only the sleeve-cuffs, neckline and hem left to write-up for posterity :) !
On different tangent, but kinda related to overlocker/serger machines I spent half and hour this evening moving all my favourite serger/overlocker pins onto a new separate Pinterest
board of their own (Sewing - Sergers & Overlockers: Tutorials & Tips) so I could find and
browse them more easily hehe!
Next up... Part Three - Sleeve-Cuffs, Hems and Neckline


.jpg)


.jpg)


Im loving this Claire... thanks for taking the time and explaining what you did x
ReplyDelete